Creating a virtual tour can feel like a daunting task, but with the right approach and tools, it’s entirely achievable, even without spending a dime. This guide breaks down the process into manageable steps, empowering you to create immersive experiences that captivate your audience. Whether you’re showcasing a property, a museum, or a scenic landscape, a virtual tour offers a unique way to connect with people and transport them to another place. Let’s dive in and explore how you can bring your vision to life.
How to Create Free Virtual Tours: A Comprehensive Guide
A virtual tour offers a simulated experience of a physical location, transporting viewers to a different place without requiring them to physically travel. By combining images, videos, and interactive elements, virtual tours create an immersive and engaging experience. Typically presented in a 360-degree format, these tours allow users to explore their surroundings as if they were present at the location. This article provides an in-depth guide on creating virtual tours for free, exploring various tools, techniques, and best practices.
Key Features of Virtual Tours:
- Immersive Content: High-resolution panoramic images and videos are crucial for creating a sense of presence. These capture a wide field of view, allowing viewers to explore every corner of the virtual environment.
- Navigation: Intuitive navigation is essential for a smooth user experience. This can include clickable hotspots, directional arrows, draggable panoramas, and even interactive maps.
- Interactivity: Adding interactive elements such as information points, pop-up text, embedded videos, and audio clips significantly enhances engagement and provides valuable context.
- Virtual Reality (VR) Support: Compatibility with VR headsets elevates the experience to a new level of immersion, allowing users to feel truly present in the virtual space.
- Accessibility: Virtual tours can be made more accessible by including features like closed captions for videos, alt text for images, and keyboard navigation.
Applications of Free Virtual Tours Across Industries:
Virtual tours have found widespread use across various sectors:
- Real Estate: Showcasing properties remotely, allowing potential buyers to explore homes at their convenience.
- Travel and Tourism: Providing virtual previews of destinations, hotels, and attractions, inspiring travel planning.
- Education: Creating virtual field trips, exploring historical sites, museums, and scientific facilities.
- Businesses: Showcasing facilities, products, and services to clients and customers, enhancing marketing efforts.
- Cultural Heritage: Preserving and showcasing historical and cultural sites for future generations.
- Retail: Allowing customers to virtually browse stores and explore product displays.
Planning Your Free Virtual Tour: The Crucial First Step:
Before diving into technical aspects, careful planning is essential:
- Define the Purpose: What do you want to achieve with your virtual tour? (e.g., selling a property, showcasing a museum exhibit, promoting a tourist destination).
- Identify Key Locations/Scenes: Determine the specific areas you want to include in the tour and the order in which they will be presented. Create a storyboard or a simple map to visualize the flow.
- Consider the Target Audience: Who are you creating this tour for? Tailor the content and interactive elements to their interests and needs.
- Plan the Narrative: Think about the story you want to tell with your tour. A clear narrative will make the experience more engaging and memorable.
- Scouting and Preparation: Visit the location beforehand to assess lighting conditions, identify optimal shooting positions, and ensure everything is in order.
Capturing High-Quality Media:
The quality of your virtual tour depends heavily on the quality of your source material:
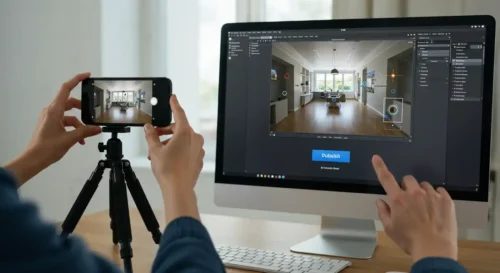
- Camera Equipment: While professional DSLR cameras with wide-angle lenses are ideal, modern smartphones can produce excellent results with proper technique. Consider using a 360-degree camera for capturing panoramic images quickly and easily.
- Tripod and Level: A stable tripod is essential for capturing sharp, consistent images. A bubble level ensures the camera is perfectly horizontal, preventing distorted panoramas.
- Lighting: Natural light is generally preferred, but avoid shooting in direct sunlight, which can create harsh shadows. If necessary, use artificial lighting to supplement natural light and ensure even illumination.
- Shooting Technique: Capture multiple overlapping images (at least 30% overlap) to facilitate seamless stitching. Use a panoramic head or a nodal ninja to minimize parallax errors.
- Image Resolution and Format: Shoot in high resolution (e.g., JPEG or RAW) to capture maximum detail.
Choosing a Free Virtual Tour Platform:
Several free platforms offer tools for creating and hosting virtual tours:
- Google Tour Creator (Discontinued, but tours can still be viewed if already created): While Google Tour Creator is no longer actively developed for creation, existing tours remain accessible. It was a user-friendly platform that allowed for creating tours using Google Street View imagery or uploaded 360° photos.
- Kuula: Kuula offers a free plan with basic features, allowing you to create and share virtual tours. It provides tools for adding hotspots, text, and other interactive elements.
- Marzipano (Open Source): Marzipano is a powerful open-source library that allows you to create highly customized virtual tours. However, it requires some technical knowledge of HTML, CSS, and JavaScript.
- Other Options: Explore other platforms like Matterport (offers free trials but is primarily a paid service) and SeekBeak (also offers free trials).
Creating Your Free Virtual Tour: A Step-by-Step Guide (Using a General Approach):

- Prepare Your Images: Edit your photos to adjust brightness, contrast, and color balance. Stitch your overlapping images into 360-degree panoramas using stitching software like PTGui (paid) or Hugin (free).
- Upload Your Panoramas: Upload your stitched panoramas to your chosen platform.
- Create Scenes/Nodes: Organize your panoramas into scenes or nodes, representing different locations within your tour.
- Connect Scenes with Hotspots/Links: Create hotspots or links to connect different scenes, allowing users to navigate through the virtual environment.
- Add Interactive Elements: Enhance your tour with interactive elements like information points, text descriptions, embedded videos, audio clips, and links to external websites.
- Customize the Appearance: Customize the look and feel of your tour by adding a logo, choosing a color scheme, and adjusting navigation controls.
- Test and Preview: Thoroughly test your tour on different devices and browsers to ensure everything works correctly.
- Publish and Share: Once you are satisfied with your tour, publish it and share the link on your website, social media, or other channels.
Promoting Your Free Virtual Tour:
- Embed on Your Website: Embed the virtual tour directly on your website to make it easily accessible to visitors.
- Share on Social Media: Share links to your virtual tour on social media platforms like Facebook, Twitter, and Instagram.
- Use QR Codes: Generate QR codes that link directly to your virtual tour and place them in printed materials.
- SEO Optimization: Optimize your virtual tour for search engines by using relevant keywords in the title, description, and tags.
Creating a compelling virtual tour requires careful planning, high-quality media, and a user-friendly platform. By following the steps outlined in this guide, you can create immersive and engaging virtual experiences for free, showcasing your location or product to a global audience. Remember to explore the specific features and limitations of each platform to choose the best option for your needs.
Frequently Asked Questions (FAQ)
This FAQ addresses common questions about creating virtual tours, especially focusing on free methods and resources
What is a virtual tour?
A virtual tour is a simulated experience of a real-world location, often created using a series of images, videos, and interactive elements. It allows users to explore a space remotely, as if they were physically present.
Why create a virtual tour?
Virtual tours offer numerous benefits, including increased engagement, improved accessibility, enhanced marketing, and cost-effective showcasing of locations or products. They are valuable for real estate, tourism, education, businesses, and cultural heritage preservation.
Is it expensive to create virtual tours?
No. While professional services exist, many free tools and platforms allow individuals and organizations to create basic virtual tours without significant financial investment.
What equipment do I need to create a virtual tour?
While professional equipment like DSLR cameras with wide-angle lenses and panoramic heads can improve quality, a modern smartphone with a good camera and a stable tripod is often sufficient for basic virtual tours. A 360-degree camera can greatly simplify the capture process.
How do I plan a virtual tour?
Planning involves defining the purpose, identifying key locations, considering the target audience, planning the narrative, and scouting the location beforehand. Creating a storyboard or map can be helpful.
What are hotspots in a virtual tour?
Hotspots are interactive elements that allow users to navigate between different scenes or access additional information within a virtual tour. They can be clickable areas on the panorama that link to other panoramas, pop-up text, embedded videos, or external websites.
How do I share my virtual tour?
Most platforms provide a shareable link that you can embed on your website, share on social media, or distribute via email.
This concise FAQ covers the most essential questions. For more detailed information and troubleshooting, refer to the documentation and support resources of your chosen platform.


